Showing posts with label craft. Show all posts

Tuesday, December 17, 2013

Last Minute Christmas Crafts for Kids


Christmas might be just over a week away, but with many kids already on school holidays and those that aren't yet, will soon be, there's no better time, or reason to set your kids up with some of these fun Christmas crafts to get them in the festive mood and keep them occupied while you are making your own preparations for the big day!

The six crafts we have selected to share with you are simple and inexpensive, but are sure to delight your little ones!


Happy festive crafty fun!

Thursday, October 3, 2013

6 Fun Craft & DIY Ideas with Washi Tape


Washi tape, or Japanese masking tape, has become very popular over the last few years for stationery lovers, crafters and DIYers alike, and for good reason! Washi tape is colourful, inexpensive and the translucent and non-permanent stick aspect makes it great for all kind of projects.

In this post we have gathered six fun craft and DIY ideas to fill your home with washi tape fabulousness. 


1. Create your own wall design with coloured and patterned tape. This is great in kid's rooms where you might want to change things up every now and then, or if you live in a rental house where you don't want to make any permanent changes to the walls, but want to add some personality.


2. You could use washi tape to display photos and mementos on your fridge, but why not take it a step further... create washi tape magnets! This fun tutorial shows you how to make the magnets look as though the tape has been torn. Such a fun way to be able to reuse your favourite tape over and over.


3. For a more permanent wall display, why not create a pattern or geometric design on paper and frame it!? It is such a simple and cost effective way to add some interest and personality to your home.


4. Create a play mat for your kids with washi tape. The colours and patterns of the tape are perfect for kids. Your little one will love their own city scape or countryside to explore and feed their imagination!


5. Pretty push pins can cost a pretty penny, but it is super easy to make your own! All you need is, you guessed it, washi tape and metal push pins. You could even decorate the plastic kind. Simple, but effective!


6. It couldn't get more basic than this! Upcycle your tin cans by removing their labels and prettying them up with some washi tape. Perfect for your craft table or the kid's crayons!

So there are six, simple, pretty and fun ideas for crafting and DIYing with washi tape. There are a plethora of them out there on the internet, so you can washi tape to your heart's content! Enjoy!

Thursday, September 5, 2013

10 Spring Activities for Kids


Despite the warmest Winter on record in Sydney this year, it is nice to feel Spring in the air. Spring is a wonderful time of year for getting outside and exploring the natural world as everything around us seems to be waking from the slumber of Winter. It is an amazing opportunity to guide your little ones through exploration of the beauty of nature.

We have scoured the internet in search of some fun, crafty and educational activities to do with your kids this Spring. Get on out and celebrate this wonderful season!

2. Start a rock collection [image from here]

[all images from linked sources]

Wednesday, June 12, 2013

Etsy Craft Party at West Elm Bondi Junction


Etsy. Craft. Party. Three words that get us very excited!

The brand new West Elm store in Bondi Junction is hosting an Etsy Craft Party on Thursday June 20 at 7:00pm and we can't wait!

We wil be getting our craft on with Sydney-based designer and artist Kitiya Palaskas who will be teaching us to make colourful paper flowers!

Not only is the FREE event going to be so much fun crafting and meeting other creatives, it is going to bring smiles to the faces of sick children as all the flowers we make will be delivered to the Sydney Children's Hospital in Randwick!

Quick jump online and register now as places are limited!

Friday, June 7, 2013

Kid's Craft Ideas for the Long Weekend and School Holidays


With this weekend being a long weekend and the school holidays only just a few weeks away, we thought we'd help all the Mums out there and put together a collection of fun and simple craft activities to do with your kids. Keeping the little ones entertained while at home can be tricky, but the best part of these crafts is you are bound to have most of the supplies at home already, so no dragging the kids around the shops or spending lost of money! We hope you enjoy them!

1. Pinwheel Necklace | 2. Shaving Cream Bath Paint | 3. Rocket Pack | 4. Rapunzel Flower Clip-In Braids | 5. Neck Tie Snake | 6. Tin Can Windsock

Wednesday, March 13, 2013

6 Easter Crafts and Activities for Kids


Easter is approaching! It is a great time of year where we gather with loved ones to celebrate new life and eat a little more than we should! To us, Easter has always seemed like the perfect excuse to do some fun crafts and activities with the kids and we have collected some of our favourites to share with you today!

4. Resurrection Cookies to help you teach the kids the real meaning of easter!
5. Grow your own easter Grass!

We hope these crafts and activities help you spend some quality time with your kids this easter and that you make some precious memories!

Thursday, June 9, 2011

The Very Hungry Caterpillar

On Monday Will and I went to Ikea. We got a few frames, two of their super cheap throw blankets and the kids toy Duktig 9-piece fruit basket.


I had an egg carton saved from over the weekend so I decided to make Will a 'Very hungry caterpillar' so we could reenact the book where the caterpillar eats the fruit :)


I just cut the egg carton in half long ways (it was just a 6 egg one) and coloured him in using crayons. Drew on the nose, eyes and little legs and used pipe cleaners for his ear thingys.


We've had lots of fun playing with him and pretending to eat the fruit ourselves too.

How good are egg carton crafts!

Have a lovely day everyone,

Wednesday, March 30, 2011

Knitting

I've taken up knitting!

Well I learnt to knit when I was a kid but I've never had the stamina to finish a decent looking project.

Image via here

So, to stop myself spending every evening in front of the laptop working or reading blogs and things I've decided to knit a throw rug!


I bought 10mm needles and this thick dark grey yarn. And I've made 5 squares of the blanket so far, above is the 6th in progress. I think I'll do 9 squares then sew them together.


Image via here

Anyway, when I was at a church women's conference on the weekend they were talking about how with the cold weather about to start, homeless people need things like blankets, socks and scarves. So when I've finished my blanket I'm going to start doing scarves!

If you are a knitter why not join me! I haven't really thought through it all yet but I think once I've done maybe 10 scarves I'll drop them into a shelter or soup kitchen in the city.

Image via here

It really is relaxing to sit on the lounge watching TV and knit. And I think that if I was living a lonely rough life on the streets, getting a hand made scarf would make me feel even just a little bit less lonely and forgotten.

So come on go get out those needles and wool and get knitting too!

Have a great day,

Sunday, February 27, 2011

Locco for Gocco

Yesterday I attended a workshop run by the Sydney Brown Owls.


It was a Gocco Print workshop and it has got me Locco for Gocco hehehe!

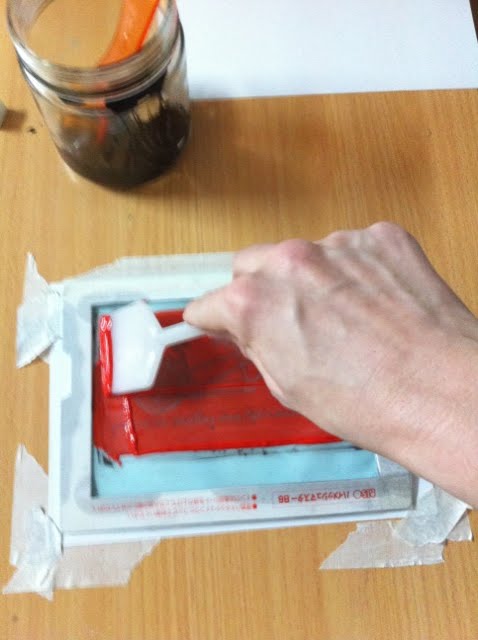
Print Gocco is a Japanese color screenprinting system developed in 1977 by Noboru Hayama. Resembling a toy, the compact and completely self-contained printer is clean, quick and easy to use. The system works using flash bulbs, a carbon-based image or photocopy and an emulsion-coated screen. When the bulbs are manually flashed, the carbon in the drawing or photocopy burns the screen into a stencil. Several colors of Ink can then be applied at one time and multiples can be stamped out, as many as 100 before re-inking is needed. Fans of Print Gocco appreciate its size, cleanliness, relatively inexpensive cost, and the fact that several colors can be printed in one “pass.” Wording taken from here.

Here are some of the girls using the Gocco machines.

Once you've made your screen from your own design you can screen print it onto paper.

And Voila! You just do that over and over again and you've got gorgeous little prints from your own design!

Here are some of the designs that were produced. It was such a great workshop and now I'm itching to get myself a Gocco machine.

If you'd like to attend one of the many Brown Owls events which are held around the country then check out Pip's blog here.

Thanks to Manu and the Brown Owls girls for organising, it was so much fun.

Have a great Monday,

Monday, February 14, 2011

Happy Valentine's Day - heart garland craft

Happy Valentine's Day everyone!

William and I have been busy this morning making heart garlands for home and for Will's little girlfriend down the road. (She turned two on Friday - he likes the older women)!

I used my red paper heart doilies and my red and white bakers twine...

To string together to make either a garland...

...or it can be hung like this too.

Will is in the middle of making a card, but he's not feeling very well today and we're off to the doctor soon so the card might have to wait.

I hope you have a wonderful Valentine's Day full of love and laughter!

Tuesday, February 8, 2011

Latest purchase and a lamp makeover

Do you want to see my latest purchase?


Here it is and I LOVE, LOVE, LOVE it!
It's one of Kerri's latest masterpieces from her Driftwood Interiors etsy store. It's called Sea Coral III in Denim and its printed on beautiful fine art paper. I love the denim blue colour she's used and as soon as she had listed it on her shop I snapped it up :)

Don't you love it? And it helps with my plan to introduce an accent colour of dark blue to the living room.

So go check out Kerri's shop if you haven't already and buy up big before she becomes rich and famous and starts charging a bomb, hehehehehe.

And here is another item I've made to introduce some dark blue...
I took an old lamp shade and used some of the navy blue and white striped cotton I bought in the Lincraft sale the other day to cover it.

If you haven't covered a lamp shade before it's super easy (well it is when you use a drum shape) simply measure how much material you'll need to wrap around with a bit extra to fold over to make a clean join, cut it with enough at the top and bottom to wrap over onto the inside of the shade. Then lay the material out flat, peg one end of the material to the top and bottom of the shade then as you roll peg more pegs to secure it. Then glue the material to the inside and use the pegs to hold it until it's dry.

The lamp base has also had a make over as it used to be brass and I kept it as brass for years but I got tired of it and decided to spray it with the trusty metal spray that Lisa from Ledamae put me onto when she gave me the silver tray you can see the side of in this pic. See the post about the silver tray here. You can see the etched pattern on the lamp coming through the white paint and it gives it an interesting patina.

What do you think?

Here it is on the hall table along with the little blue and white turkish bowl I showed you last week.

And I've got another exciting project/find to show you in the next day or so which I stumbled across this morning! YAY!

Have a great day everyone!!!

Thursday, February 3, 2011

A Mini DIY

Last week I decided to take down the chalk board in the kitchen and make a notice board .You know what it's like, bits of paperwork tend to mount up in the kitchen.. party invites, 4c petrol vouchers, shopping lists etc.

So I bought a small canvas for $6 from a cheapy shop, got some of my hessian out and cut it to size so it would wrap around to the back of the canvas and just used my everyday paper stapler and stapled it to the frame at the back of the canvas.

Then I got out some pretty light blue ribbon that matches the kitchen and stapled it on too. Easy.

It's been so handy already and matches my cutlery print I made late last year.


So just a mini DIY... but the best sort; a practical one.

On another note, still waiting for more info on Cyclone Yasi. There are no reports of death or injury as yet so that's good news but just hoping that everyone in Mission Beach, Tully etc are ok. And I hope our fellow blogger Sharyne is ok!

Take care,

Monday, November 29, 2010

Some little additions to the kitchen

I hope you had a great weekend!
We did! I bought three ceiling fans on Saturday from Beacon Lighting to put in the bedrooms we will hopefully get them installed soon, we are also having a new aircon installed tomorrow!!! YAY getting ready for summer!

While I was out shopping for the fans I stopped in at Spotlight to get a few Christmasy things. Like Bon Bons, gift tags, I think I want to make some white bunting for the deck and I also spotted this cute white 'Kitchen' sign and couldn't resist!

Look at that groovy retro typeface! I love it and doesn't it go well with my old style radio! If you're new to my blog and want to see my little kitchen makeover post click here.

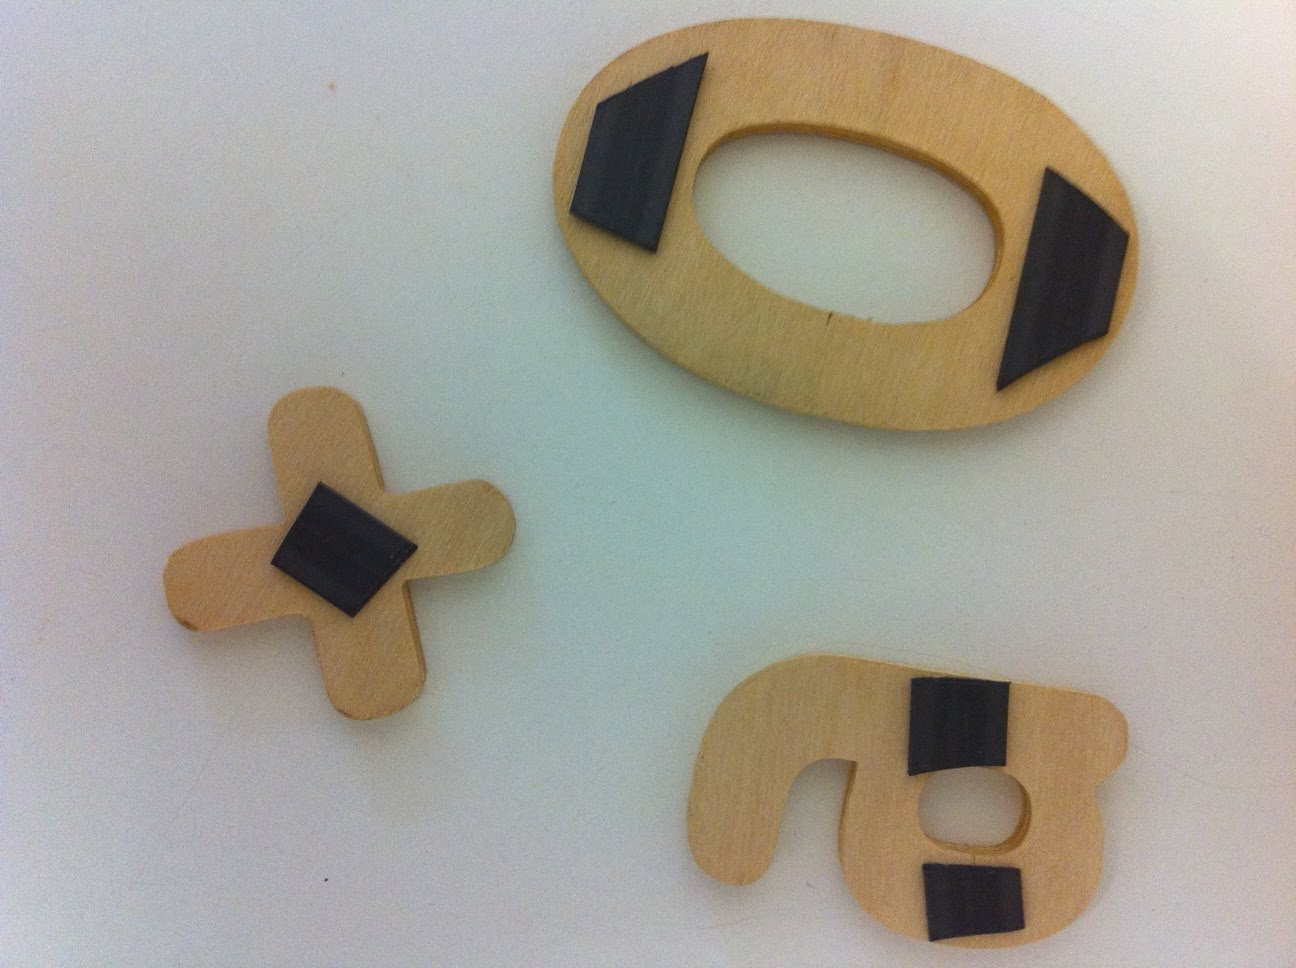
Another new addition in the kitchen are these wooden alphabet and number magnets I made for Will to play with.


We were given two wooden puzzles handed down from friends but when all the pieces were ending up everywhere (and Will's not really old enough for a 26 piece puzzle) I decided to turn them into magnets for the fridge.

I bought a long roll of magnetic tape with a sticky side to it and chopped pieces off and stuck them on the back of the puzzle pieces.

They look great and have already provided a good hour or two of play time for Will!

I love it when you can re-purpose something don't you???

On Sunday we had a birthday BBQ for Glen's birthday with family and friends.

I was cheeky and turned the numbers around on his cake :)
It was a lovely afternoon and all the kids played really well. Oh and see the massive sandpit you can see in the background? Well we are part way through a landscaping project... I will do a post on it once we've finished.

How was your weekend? What did you get up to?
Have a great day,

Thursday, October 21, 2010

DIY circus tent

Yay, I just finished it!!!
Last night and today I've been working on a 'circus play/reading tent' for Will and here it is, I hung it from the gum tree in our backyard...

I bought the stripy fabric from Ikea for $14.95 and I had the white fabric in my big box of material.

I got the Hoola Hoop from Targe for $6 and the string/ribbons were already in my sewing box.
I can't wait for him to wake up from his midday nap so I can show him and we can play in it.

I think we will be spending a lot of time reading in our new cosy circus tent!!!

I used and adapted instructions on how to make it from this fantastic book 'Cool Spaces for Kids' which I bought recently.

Better go, I'm off to play in 'my' tent!!!

Have a great afternoon,